Force Feedback
Reader Suggestions
- Brad DuTemple:
- Modifying Your Logitech Pedals
- Kevin Caldwell:
- Keyboard Clearance
- Increasing Rotation
- Setup and Installation
- Spring and Damper Effect
- Peter Prochazka:
- DxTweak
- Oscillations and Latency
- Sticky Wheel
- Putting
Ball Bearings in your Logitech Wheel
Brad DuTemple
Modifying Your Logitech Pedals (revised Nov 19th 1999)
It's time to dig out your Logitech pedals, and give them one
more chance. With a simple modification, you can increase the
travel of the brake pedal by a full 40%.
Brake Pedal Spring
If you haven't already done so, this would also be a good time
to replace the brake pedal spring with a slightly heavier one,
available at most hardware stores for mere pennies. Take your
old spring with you when you get your pedals apart, and find a
replacement of equal size, but heavier gauge.
Note from Alison: see here
for details about the springs I used. Also, the newer
Logitech units have stronger springs and probably don't need
to have their springs replaced.
Brake Pedal Travel
 The
brake pedal in the logitech pedal assembly is actually compressed
quite a bit (about 13mm). I measured the stock pedal travel at
approx 25mm, with the wheel assembled. I measured 38mm with the
top off and the brake pedal resting on the spring. Freeing up
the brake pedal to make use of some of this wasted compression
(travel) turns out to be fairly simple.
The
brake pedal in the logitech pedal assembly is actually compressed
quite a bit (about 13mm). I measured the stock pedal travel at
approx 25mm, with the wheel assembled. I measured 38mm with the
top off and the brake pedal resting on the spring. Freeing up
the brake pedal to make use of some of this wasted compression
(travel) turns out to be fairly simple.
With a few minutes time, a small hacksaw blade, a phillips
screwdriver, and a small file, you can reclaim that wasted (and
precious) brake pedal travel.
As delivered, the topside of the base has a 25mm X 45mm hole
that the brake pedal comes through,
You need to get some of that plastic out of the way to let
the brake pedal rise up a little higher through the base.
To mark the cut for the brake pedal slot, put the pedal in
the top half of the base so that it comes through the hole and
rests against the bottom of the top. Mark either side with a razor
blade, or sharp knife. Cut the slot to 26mm and adjust to length
with a small file.
Cut a 17mm wide X 28mm vertical slot directly under the hole
where the brake pedal comes through the top of the base, thus
allowing the brake pedal to protrude higher through the top of
the base, like so:
        <-----25mm----->
         --------------      ^
        |              |     |
        |              |     |
        |              |    45mm
        |              |     |     original brake pedal hole
        |              |     |
        |              |     |
         --          --      X     new cut starts here
           |        |        |
           |        |       28mm
           |        |        |
            --------         v
           <--17mm-->
 NOTE:
The length of the slot determines the amount your brake pedal
will rise. You want a little compression on the spring, so that
it will stay in place. Don't cut this slot too long, or your brake
pedal spring will not stay in place. Don't get greedy! Best to
cut the slot a little shorter to begin with and adjust it to length
with the small file. Neatness counts here, and keep the dust out
of your pots.
NOTE:
The length of the slot determines the amount your brake pedal
will rise. You want a little compression on the spring, so that
it will stay in place. Don't cut this slot too long, or your brake
pedal spring will not stay in place. Don't get greedy! Best to
cut the slot a little shorter to begin with and adjust it to length
with the small file. Neatness counts here, and keep the dust out
of your pots.
Bevel the sides of the cut to help guide the arm of the brake
pedal, and ensure that it travels freely without scaping either
side. I now have a full 10mm more brake travel, when measured
vertically on the compression spring centerline.
The base has suffered no ill effects due to this modification,
and is as sturdy as ever. (now over 4 months daily use)
Acclerator Pedal
The accelerator pedal is not compressed very much at all, so
there is very little to be gained with a similar relief slot.
However, you can remove the adhesive rubber bumper inside the
base unit that sits under the gas pedal. This will gain you approx
3mm of travel, but will allow the spring to bind a little under
full compression.
Removing the bumper under the brake pedal will show a similar
gain in pedal travel, but ONLY if you use the stock spring. A
stiffer spring will bind before it even hits the rubber bumper,
so there's nothing to gain by removing it if you have replaced
your stock brake spring.
 Completing
the Project
Completing
the Project
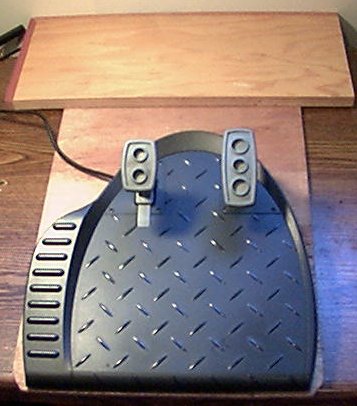
After installing the heavier brake pedal spring, I noticed
the pedal base had an increased tendency to slide on the floor
during use. I found a scrap piece of 1/8" Mahagony
door skin, and a short length of 3/4" Plywood from a trimmed
shelf. I took measurements from the wall behind my monitor
with my wheel and pedals in driving position, and assembled the
base to match. I fastened them together with wood screws
to form a T-shaped base for the pedals. The pedal base unit
is secured to the 1/8" Mahagony with 4 Dry-wall screws into
the bottom of the base. NOTE: Make sure you don't
hit anything with the screws!
I have a small mark on the baseboard of the wall, so that I
can quickly put them in the correct place. They are always
in exactly the same position relative to my wheel and monitor,
which I think is important for consistent driving in GPL.
They are VERY solidly braced against the wall, and they NEVER
move.
Total time invested in the project, ( it took me longer to
write the article!) 1.5 hours.
Total monetary investment, pocket change.
The improvement over the stock Logitech pedal unit is phenomenal!
- Brad DuTemple
Kevin Caldwell
Thanks for all the info on FF. I've been struggling with mine,
and your settings are far better than anything else I've tried.
I'm running the LTFF (USB) and CH pedals (gameport on a SB
Live!).
Just a few comments:
Keyboard Clearance
I too had problems with my keyboard tray and the LT. I ground
off the collars on the clamp thumb screws, and gained about 1/4"
of clearance. This was enough to let my keyboard tray work. Just
used a Dremel tool, and didn't disassemble anything.
Increasing Rotation
I removed the stock bump stops on the wheel, and put thin tubing
on instead. This gains maybe 10 degrees of wheel rotation, and
doesn't require any other changes.
Installation and Setup
I uninstalled the Logitech Wingman Profiler. The wheel still
works fine. I find it way too confusing with the game controller
settings, GPL settings, DXTweaker, and Profiler settings, all
affecting the same parameters in different ways. I haven't found
that the DXTweaker effects GPL at all, so I stopped playing with
it too. Basically that leaves the linearity slider and steering
ratio in GPL, and the force feed back settings in the game controller
and the core.ini - that's enough for me! I find it easier to drive
without the Profiler non-linearity.
I found I can plug the CH pedals into the gameport, and they
work fine with the LT on the USB port. I made a custom 2 axis
controller I called CH pedals, and if I install two copies of
it at ID's 1 and 2, with the LTW USB at ID 3, they happily co-exist.
I don't lose the pedals or anything when I make changes to the
LT settings.
Spring and Damper Effect
I also found this at the LT web site. If I read it correctly,
the damping and spring effect is actually called up by the sim
FF. Maybe it should be on slightly at least? I don't like the
effect of much damping either, and was getting close to your settings
on my own. I am running the force at 220 in the core.ini. I like
a little more force for my $200Can!
Q. What does the "Damper Effect Strength" slider
do for force feedback gaming controllers?
A. The "Damper Effect Strength" slider is a feature
of LWS accessible only by force feedback gaming devices. This
slider controls the strength of the damper forces within force
feedback games. Damper forces slow down the movement of the gaming
device in a particular direction. Examples of damper forces would
be items such as water or mud. By moving the slider beyond 100%,
the damper forces get stronger, and the gaming device will feel
more sluggish when you encounter a damper force. By moving the
slider below 100%, damper forces will not affect your gameplay
as much.
Q. What does the "Spring Effect Strength" slider
do for force feedback gaming controllers?
A. The "Spring Effect Strength" slider is a feature
of LWS accessible only by force feedback gaming devices. This
slider controls the strength of the spring forces within a game.
Spring forces are the effect of the wheel/stick being pulled into
a certain direction by the game/software. The farther that you
move the handle away from the direction that the force is pulling
in, the stronger the force effect will get. By moving the slider
above 100%, the stronger that resistance will be. An example of
this would be trying to pull out of a dive in a flight simulator.
The more you try to pull out of a dive, the more resistance you
will encounter.
The default centering spring that centers the joystick handle
or steering wheel in games that do not support force feedback
will not be affected by this slider. However, games that support
force feedback may or may not disable the default centering spring.
- Kevin Caldwell
Peter Prochazka
DXTweak
About the DXTweak settings: I think, that GPL gets its input
data from a 'deeper level' (directly from the wheel driver?) than
DXTweak is able to come into play. If you use a non-FF wheel in
GPL with the Direct Input driver, you must calibrate the wheel
in GPL regardless of having it calibrated in windows or not. DXTweak
seems to tweak the windows calibration, but GPL doesn't use this.
The Logitech Profiler obviously tweaks the 'calibration' of the
LWFF driver itself. But all this is my speculation, since I don't
really know how the combination LWFF, its driver, Direct Input
and GPL works.
Oscillations and Latency
About oscillations and latency: I also had the idea that the
rapid oscillations of the wheel could be decreased with the right
latency setting. If the wheel is not centered on high speed (for
example when coming out of a fast corner), the force wants to
center it. If the force comes too late and so stays too long it
will throw the wheel over the center, which in turn induces an
opposite directed force, which also comes too late and so on...
But the problem are not really the straight line oscillations,
but with too low latency the wheel will 'snap back' too violently
in some situations. Maybe this is what you meant, when you wrote
that the wheel 'bites' you, when you handle the car too rough.
With my old FF settings (the 'high damping' ones), I set the
latency by trying to eliminate the oscillations. I found that
a value of 0.103 eliminated them pretty much and also reduced
the 'snap back' tendency. With your 'zero damping' settings (which
feel WAY better...) it is more difficult to eliminate the oscillations.
The problem is that I never know if the latency is too low or
too high (which shows the same symptoms as a too low setting).
It seems that a latency around 0.1 reduces the oscillations for
me.
Such a high latency gives a quite 'notchy' feel around the
center of the wheel, but I think I can get used to this better
than having a wheel, that 'bites' me, whenever I push hard.
Note: I discussed the latency and prediction issue with
Dave Kaemmer just before receiving these comments from Peter.
Like Peter, Dave felt that the oscillations were an effect of
the latency, and that increasing GPL's prediction was a good way
to eliminate the oscillations. He felt that the prediction setting
which eliminated the oscillations corresponded with the actual
latency of that particular FF device.
I'm not sure I entirely agree with Dave and Peter. Oscillations
occur in real cars too. I think that they tend to be more noticeable
in GPL because we have a faster ratio steering than in real cars,
and correspondingly lower forces at the wheel rim. Therefore,
it's easier to make a sharp enough input to excite the car into
a high amplitude oscillation. Also, in a real car, the seat of
the pants feel from handling the car roughly tends to discourage
overly abrupt steering inputs.
I'd guess that some of the tendency to oscillate is due
to latency in the wheel, but not all. I continue to prefer minimal
prediction and minimal damping, and deal with the oscillation
by driving smoothly, and - I believe - more realistically. - Alison
Sticky Wheel
About your 'sticky' wheel: I don't have (and never had) the
impression, that my LWFF is too sticky or has too much friction.
Of course I never expected a FF wheel to be so smooth as a high
quality non-FF wheel. But recently there was a post on RAS from
a guy, who had the guts of tearing his LWFF apart and mounting
ball bearings into it. He reports about this on his site: http://w1.111.telia.com/~u11103812/lwff.htm
Maybe this could solve your problem (if you dare to do it, I don't...
:-)
- Peter Prochazka
 The
brake pedal in the logitech pedal assembly is actually compressed
quite a bit (about 13mm). I measured the stock pedal travel at
approx 25mm, with the wheel assembled. I measured 38mm with the
top off and the brake pedal resting on the spring. Freeing up
the brake pedal to make use of some of this wasted compression
(travel) turns out to be fairly simple.
The
brake pedal in the logitech pedal assembly is actually compressed
quite a bit (about 13mm). I measured the stock pedal travel at
approx 25mm, with the wheel assembled. I measured 38mm with the
top off and the brake pedal resting on the spring. Freeing up
the brake pedal to make use of some of this wasted compression
(travel) turns out to be fairly simple.