 |
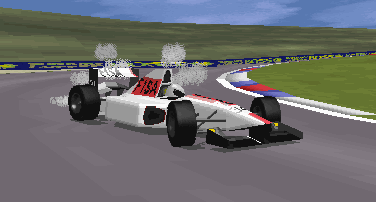 |
How many people recall watching Formula One back in the early 80s, those halcyon days of wide tyres, turbo's and power levels almost unimaginable now? One of my enduring memories of those days is not of Piquet, Pironi or Villeneuve, but of Niki Lauda. Although lacking the glamour and excitement of the younger drivers, Niki's talents came not from passion but from knowledge and experience. Friday and Saturday qualifying would unfold as a dogfight between all of the young guys, but come race day a different picture would emerge. Niki Lauda, starting from 12th on the grid and having been off the pace and out of my thoughts all weekend, would almost mesmerically work his way, apparently effortlessly, past the entire field to win. Watching this display (for there's no other word for it), you somehow had the feeling that he was in possesion of information the others didn't have. There's no doubt that Lauda's driving skills were from the absolute top drawer of motorsport, but so was the driving of many other drivers on the grid alongside him. Whilst driving style and experience play a large part in a driver's overall performance, a further component of that speed is simply confidence. Confidence of this type comes at least in part from having a very good setup. Not only will a good setup be smoother (=faster) around the circuit, but the very predictability of the car when using that setup will further inspire confidence to force the car toward the edge of its capability, and to drive it there for lap after lap. Naturally this can only be good for your lap times. So why am I telling you all this stuff about the real world of Formula One? Well, whatever else GP2 may have achieved, one thing which is irrefutable is that it has taken sim-racing giant strides closer to the real world as far as setup is concerned. In writing this article Sim Racing News has gratefully accepted the assistance and expertise of Doug Arnao, not only one of the fastest guys on CompuServe in ICR2, GP2, NASCAR and on Hawaii, but also someone whose day job involves developing, setting up and testing race cars (do I hear "lucky sod" from anyone?!). Doug's experience in this field not only helps his job, but it also helps greatly in GP2 since GP2's setup affects the car in exactly the way it affects a real car. So next time you're watching F1 on TV, see if you can get Schumacher's setup captured on video!! When compared to F1GP, in GP2 no longer is car "balance" determined simply by the ratio of front:rear wing compared to driving style, but springs, fast bump and rebound, slow bump and rebound, anti-roll bars, ride height and packers all play a part. Not only that, but they all affect each other! Ahhhhhhh!!! Everything you do is a compromise, balancing the gains from one part against the losses from another. Softening the rear may mean more grip and traction, but it also means less steering response and more understeer - which is best in each case? That is the purpose of this article, and we'll try to explain at least one method of determining a setup from scratch from first arriving at a circuit until turning those hotlaps. There are many ways to create a setup, and this is not the bible of all that is true - it is simply one way that works, and a starting point from which to make your own setups and discuss with people to develop more and better adjustments. So, your plane has landed, the car has been unpacked and loaded onto the transporter, and you're driving through the gates of the circuit - what now? Use your head Your first time...
                              Slow     Fast
                Front Bump         10        00
                Front Rebound      15        02
                Rear Bump          07        00
                Rear Rebound       12        02
Now, load up 20 laps of fuel and head out onto the track. Take it easy here, learning the circuit, learning the braking points, where you can push and where you can't. DO NOT try to push hard and constantly spin off, that way will only mean this phase will take longer and you will most likely get frustrated. You are not going to do a hotlap in your first laps, so forget the times you've seen on the WWW, and even if you're several seconds off that pace you shouldn't be concerned. The time will come, but only if you work at it correctly. I personally try to slowly build up speed and then to concentrate on two corners only during the lap, learning what I can do at them. Once I have those right, choose another two. Eventually the whole lap will be reasonably quick and you can start chipping away the tenths. On these laps you should be first of all learning the track, and once you are reasonably proficient with the tracks cornering and braking points, start gently pushing the car toward the limits, and very carefully watching what it does. Especially by gentle application or reduction of the throttle in mid-corner, you can begin to feel what the car wants to do. Below we will describe each element of the setup, so mentally (or on paper) record those problems, and search for solutions in the adjustments below. Pay particular attention to :-
During these laps, we also encounter one of the perennial problems of setting up a racecar, "cause and effect". When you encounter some difficulty, it is extremely important to think about if the car is causing the problem, or if maybe it is your driving that is causing the problem. If you brake early for a corner (through not knowing the track) and turn-in too early, it's natural that the car will understeer because you will get back on the power too soon and push the front out toward the exit kerb. In this case you may go into the garage and dial in more oversteer, but that would be the WRONG thing to do, and would take your setup down a wrong path. Similarly braking too late can lead you to turn-in sharply with a high steering angle, and getting on the power again will cause you to oversteer, slide or spin. The car may well have a problem with oversteer, but you can't decide based upon this. When you encounter a problem lap-after-lap, think carefully about whether you are causing it by imprecise driving, or if it really is a symptom of something wrong with the car. Okay, let's return to the garage and look in detail at
the setup. The wings The orthodox method of wing adjustments is to firstly select your rear wing setting, and then set your front wing to balance the car as you like it. I personally prefer a front wing set at least three or four notches higher than the rear (and often more), but others prefer the front set LOWER than the rear to induce understeer (although this is not to be recommended. If understeer is your aim then find a neutral balance with the wings, springs and roll bars, and dial-in a little understeer with the dampers). Choose a setting, go out and test and then make adjustments to the front wing until it's balanced. Don't worry that your rear wing may not be correct, you will try a variety of settings until you find the best one! Another method of of setting the wing is to choose the front wing setting which will get you around the corners, and then to progressively lower the rear wing until you can just retain control of the car. This method is primarily of benefit in hotlapping, where many drivers slide the car through a corner on severe understeer (thus the rear doesn't spin as easily as it would with a normal entry style). A hotlap setup is just what it says, designed to run one lap at the maximum possible speed, and generally they are not very stable and therefore not so useful for race driving (and you wondered why those setups fron the internet felt difficult to drive?!). In a future article we will cover hotlap setups, but for now we will concentrate on creating a stable, drivable car, and teaching you HOW the changes work, then you can begin experimenting for yourself. Finding the right gear Sixth gear should be set, as described, to redline just a second or so before your braking point at the fastest part of the circuit, and your first gear should be a compromise between good acceleration from the slowest corner, the amount of wheelspin from the lowest corner, and the need to get away from the grid at the start. Lower means better acceleration (especially off the grid), but means "longer" gears throughout the rest of the gearbox, more chance of wheelspin, and more chance of spinning the car. Higher means slower away from the grid and the slowest corner, but improved acceleration through the other gears, and less wheelspin. Wheelspin can also be controlled by softening the rear shocks, and/or low & high speed dampers. As ever, compromise, test and decide. Another approach proposed by Achim Trensz (top hotlapper, author of several of our track guides and all round nice guy!) is to set first gear quite high, in the range of 37-39. Whereas this would murder the clutch in a real car, in the sim it's perfectly possible and means it is easier to avoid unwanted wheelspin when driving, also allowing higher gears to be grouped more closely together. Again this is somewhat of a hotlapping approach since first gear need only get you away from the slowest corner - in a race first gear will also have to get you off the grid, and while such a high first gear will make it easy to avoid wheelspin, it will probably not give you the acceleration necessary to make a good start. Try it and see what works for you. For the gears in between, there are two approaches. In the old days of F1 they were chosen partly to give the best acceleration, but partly so that you never needed to change gear in mid-corner. Not only was it risky taking one hand from the wheel, but the action of double-declutching and disconnecting the wheels from the engine would lose power and grip to the rear wheels. As you can imagine this upsets the car balance more than a little - very risky. Nowadays with semi-automatic gearboxes this is not an issue, but if you are using a T1 or similar controller where you need to remove your hands from the wheel, consider adjusting your gears so that you don't need to shift in mid-corner. The theory is that if you enter a corner in third and need to shift to fourth mid way through, try lowering your third and fourth gear. Then you will be already IN fourth gear when reaching the corner, and it will be "long" enough that you will only need to change to fifth after you have already exited that corner, and hopefully on the next straight. You could also make third gear "longer" (higher ratio) and hope that you could remain in third all the way through. If this isn't a problem for you, choose the ratios that give the best acceleration, wider gaps for the low gears, becoming closer as you go higher through the gearbox. Balancing the brakes This is all well and good, but what does it have to do with brake balance? Well, generally the front and back of your car will have vastly different levels of grip since there will be different levels of wing front and rear, the wings are of different sizes, size of the tyres are different, wear level of the tyres are different etc etc. This generally means that your wheels will lock at different times. Not only that, but under braking the weight of the car will be pitched violently forward, so that the front wheels are supporting much more of the car's weight than the rear. This makes the rear of the car "light", consequently less downforce and more likely for the wheels to lock up. What YOU need to achieve is the front and rear wheels locking simultaneously. Why you may ask? Well, the reason are, from least to most important...
You can feel this happening when testing, and in the practice
sessions you must find the ideal balance for the race. Remember that not
only does the TOTAL downforce change when you go from high-speed to low-speed,
the RATIO of the downforce will change as you slowdown too. At high speed
the rear will generally have more downforce (and therefore grip better and
brake more easily), but it could be that at low speed you have more mechanical
grip at the front. Due to this, your brake balance setting may work well
at high speed but lock up the rears at low speed. In this case you must
be guided generally by the clock and by your own driving preference. It
is usually A BAD THING to have the rear wheels lock, and A GOOD THING to
have the most efficient braking from high speed (rather than low speed),
since this will help you complete overtaking opportunities. With these is
mind make your adjustments, preferably using the section of track where
you have to brake the heaviest (Hockenheim's OstKurve chicane, or Aida's
Hairpin Corner). If the car wants to spin under braking, move the brake
balance toward the front, and if it refuses to turn under braking try moving
the balance to the rear. Remember this can also happen if you've locked
ALL FOUR wheels. Review the telemetry traces and check the "wheelspin"
graphs. If you see a sharp downward spike that denotes wheel locking. If
front is first, brake balance should go slightly to the rear (remember,
don't lock the rears first!), and if the rear is first brake balance should
go to the front. if ALL FOUR are locked you are not easing off the brakes
correctly. You can use full brakes for a fraction only before easing off,
so practice to improve this area of driving. Now things are getting a little worrying. We've clicked on the "Advanced" button, chosen Level 2, andlo and behold, a veritable feast of options awaits us. Within this screen you have the potential to create an ill-handling monster of a car or the sweetest, smoothest drive imaginable. This is the nerve centre of a setup. Springs Softer springs Harder springs Higher level of grip Quicker, more responsive handling Less tyre wear Possible to run lower car (more grip) Higher ride height required Lower grip from the tyres Less responsive handling Greater tyre wear Now let's take an example - Monaco. Around the tight streets of Monaco you need a car which reacts very quickly to steering inputs and will go exactly where you point it - that means hard springs. On the other hand, you need LOTS of grip, especially at low speed where the wings won't help so much - that means SOFT springs!! Which is faster for you? The tendency in GP2 is to set the front reasonably stiff (1,200lbs or more) and the back reasonably soft (800lbs or so). However, at some circuits an all stiff setup works best. If you are going to use the kerbs a lot you may need springs which are stiffer, especially if the kerbs are not "designed" to be used (some kerbs in GP2 have little or no influence on the car (Jerez T2), others have minimal effect (Ostkurve inner chicane) and yet others launch you into the air (you know which ones!)). For the kerbs designed to be used you don't need to worry about spring settings, but if you want to clatter through Casino Chicane as fast as possible, you'll need to stiffen up the car. When considering the springs, remember also that the springs work in conjunction with almost every other item on the car, and changing the springs affects ride height (hence also packers), anti-roll bars, brake balance, damper settings - almost every aspect of car setup. For example, softening the front springs will cause the car to "dive" more under braking (the front springs compress, thus lowering the nose), and therefore ride height may need to be increased at the front. Also the weight grip will increase at the front (since the softer springs will increase grip, especially under braking) so the brake balance may need adjusted. Adjusting the springs can affect many other items on your setup, so think your way carefully through any adjustments you want to make. Anti-Roll Bars To set your anti-roll bars, you need to pick a long constant speed corner at the circuit you are working on, and use that corner to make adjustments. The reason for choosing such a corner is that the dampers also have an influence on corner balance, but they only work while you are steering (during steering transients or weight transfer). Similarly the springs will have their main effects while accelerating or braking. By working on a shorter corner or while accelerating or braking, the dampers and springs will be dominant, and they will mask the effects of the ARBs to some extent. A corner like Magny-Cour's "Estoril" or part of the Beckets complex would be ideal. If you are always accelerating through the only suitable corner, simply maintain a constant throttle rather than accelerating, just to test the spring settings. Less understeer (more oversteer) soften front or stiffen rear Less oversteer (more understeer) soften rear or stiffen front more grip (less responsiveness) soften front and rear more responsiveness (less grip) stiffen front and/or rear Ride height & Packers First of all bear in mind that the overall aerodynamics of the car are designed to work with the rear of the car around 25mm higher than the front, so that's a target to aim for in your adjustments. From this starting point progressively lower the car, all the while maintaining around a 25mm differential. For a hotlap, packers are generally less useful - as long as the plank lasts for one hotlap it doesn't matter if it wears away. This may mean that you need to run your outlap at low speed on longer tracks (Spa, Suzuka, Hockenheim), but that's a small price to pay since using packers to save the plank may compromise your ultimate speed setup. However, on other tracks packers can help, especially the longer tracks where the plank could wear away within only one lap (!), or where you are running a VERY low car. Now, let's bring the packers into play. These are most useful at circuits with very high top speeds, and are indispensable at places like Hockenheim. The ride height and packers need to be set AFTER the springs, since how low you can run the car will depend upon how much your springs are going to compress under the downforce of high speed. Your aim is "To run the car as LOW as possible (maximising undercar downforce), ensure the car is NEVER riding on the packers through any corner (at least not a corner where you require grip from that tyre), and have the settings so that the plank only occasionally "flashes" when reaching the highest speed. To do this requires a balance between packers and ride height. First of all, set the ride height. Lower the ride height to 44mm rear, and 22mm front. Now increase by 1mm each time, and continue to raise until the plank DOESN'T flash yellow when going through the fastest corner on the track (make sure to test using the fuel load you are going to use in your race!). Having set the ride height, now you can add packers. Since you have set the plank so that it doesn't touch during the fastest corner, that means all the corners will be run on the springs. This is important as if the car is sitting on the packers when entering a corner it is the same as having all springs set to fully stiff - try it and see how difficult it is! You don't want that to happen. With the setting you got, the plank should only touch the ground on straights where you are going faster than you were through the fastest corner (by "corner" I mean something like Eau Rouge or Suzuka's "130R", not the long gentle curves of Hockenheim). The front and rear are set separately - if the rear is softly sprung (900 or less), set the packers to about 3mm less than the ride height. If the rear springs are quite stiff (more than 900), try setting the packers to 2 or even 1 less than the ride height. Now test again. If you have handling problems, you know instantly that the car is sitting on the packers through the corner - that will give you problems. Otherwise, look at the performance data graphs, and study the suspension travel section along with the track map. At the point you had the problem, see which springs were riding on the bump rubbers (no suspension travel left - the line will be at the ZERO level), and then lower the packers for that spring by 1mm. Test again and repeat the adjustment until you have no problems. Dampers So you want to know about GP2's dampers,
eh? Well hows about I just tell you what affects they have on a real race
car and some basics on what they do and how they change the dynamics of
a modern day formula car. As long as Geoff has modelled everything as real
as possible, then they should work as advertised. Well, guess what?....they
do :-)
GENERAL FAST DAMPING For fast speed adjustments, pick a bumpy turn at the particular track you're working on. Start with bump at 0 and rebound at 2 and work your way up until the front UNDERSTEERS over the bumps, then back off 1 or 2 clicks. Then do the same for the rear until it OVERSTEERS over bumps, again back off 1 or 2 clicks. Always keep the fast rebound higher than the bump - 1.5 to 3 times so. The stiffer the spring the stiffer the rebound setting. It is the fast rebound's job to resist spring pressure and unsprung weight (wheel, tire, hubs, brakes etc) when the suspension droops. Usually a setting of 2 times the fast bump works well in GP2. Make sure the car likes "usable" kerbs, too. This may require softer settings than done in your bumpy turn test - everything is a compromise. SLOW DAMPING ENTRY type 1 : Increasing braking + increasing
steering ENTRY type 2 : Decreasing braking + increasing
steering ENTRY type 3 : Increasing steering at
constant throttle MID-CORNER TRANSITION : Decreasing steering
back to zero at constant throttle EXIT : Decreasing steering + increasing
throttle (or decreasing braking) Here's a chart to help understand low speed damper adjustments:
  ---------------------SLOW-SPEED DAMPER ADJUSTMENTS GP2----------------------

 CORNERING PHASE        MORE UNDERSTEER         MORE OVERSTEER

  Entry Type1            F bump +                 F bump -
                         R rebound -              R rebound +

  Entry Type2            F rebound +              F rebound -
                         R bump -                 R bump +

  Entry Type3            F bump +                 F bump -
                         F rebound +              F rebound -
                            or                       or
                         R bump -                 R bump +
                         R rebound -              R rebound +

  Mid-corner             F bump -                 F bump +
  Transition             F rebound -              F bump +
                            or                       or
                         R bump +                 R bump -
                         R rebound +              R rebound -

  Exit                   F rebound -              F rebound +
                         R bump +                 R bump -

                          + = increase adj.
                          - = decrease adj.
                          F = front
                          R = rear
 -----------------------------------------------------------------------------
These are the basics of how they work on real race cars and they seem to work correctly in GP2. There are more complicated things they do in real life, like control the aerodynamic platform and downforce consistency by reducing excessive pitching and yawing. I doubt they've gone that far in the game, but if they have it's something else to look at. --Doug Arnao (Vehicle Craft Inc.) That's basically it for the setup, and as you can see it is not so difficult to understand. It is certainly frustrating at times as it all gels together or falls apart depending upon balance. Two setups can look utterly different and yet be equally quick depending upon how well each component complements or fights the other components and the driving style. It also shows you why you cannot simply download a setup from the 'net and expect it to be quick. With effort you cn learn to drive it, but ultimately you will be compromising your own driving style and will be unable to express yourself with it (that's a flowery way of saying "you'll be slower"!!). In closing this article we'll leave you with a few thoughts to work through on your own....
Well, that's it from this Sim Racing News guide, and we hope you'll find it useful. There's an awful lot of work and testing gone into this, so we'd like to extend our thanks again to Doug Arnao who helped out so much. We think this is not only comprehensive but also accurate, but we're open to suggestions and criticism. If anyone has any suggestions for improvements or simply needs setup help, drop us a line and we'll try to help. |