Developing a Setup
Dialing
it in
Finding
the balance
Once the car's basic parameters
are laid down, the next step is to balance it so that it's neither
understeering nor oversteering
too much. We want the car to be stable in corner entry, reasonably
neutral in midcorner, and to deliver the power progressively as
we leave the corner.
The primary parameters for setting
the car's overall balance are the anti-roll bar settings. Camber,
toe, and spring rates also can impact the car's balance, and the
damper settings (which we'll get to in a moment) can also impact
the car's balance in transient conditions and over bumpy surfaces.
The brake bias affects the balance in the entry phase of the corner
if the driver is trail braking.
At this point, we'll focus on
the anti-roll bars and brake bias. The rule of thumb for the bars
is stiffer at the front and/or softer at
the rear increases understeer, while softer at
the front and/or stiffer at the rear increases
oversteer.
When adjusting the bars, keep
in mind that changing the overall roll resistance (for example,
softening the front bar while leaving the rear the same) will
impact the tire temperatures and thus may require a camber change.
Also, going softer overall may allow the suspension to bottom
where it didn't with higher overall roll resistance, while going
stiffer overall may make the car more nervous over bumps.
For this reason, GRE incorporates
a feature which assists the user by optionally keeping the overall
roll resistance the same whenever the bars are adjusted.
For the brakes, more bias
to the front increases understeer, to the rear
increases oversteer and makes the car less stable in corner
entry. The trick is to find the most rearward brake bias the driver
can handle (given his/her style of corner entry) without destabilizing
the car, since this will shorten braking distances.
Anti-roll bar settings are impacted
by relative tire width. I believe GPL's cars all have the same
width tires at the front, and the same width at the rear. However,
the GP Lotus has wider rear rims, which makes its
rear tires more efficient. The GP Lotus seems to need higher
rear roll stiffness relative to the front than the other cars
to avoid having too much understeer.
Overall chassis width vs. center
of gravity height has an impact on the amount that the chassis
rolls. Wide chassis like the Ferrari and Lotus need a little
less overall roll resistance, while the narrow Brabham
and the BRM, with its second crankshaft way up high, need stiffer
bars.
Brake bias settings are a function
of the weight distribution of the chassis. A chassis with more
weight on the rear wheels at rest will have more
weight on them under braking, so it can tolerate more rearward
brake bias.
Brake bias is also a function
of the length of the chassis. In a shorter chassis, the
more weight is transferred to the front wheels under braking,
so the brake bias has to be set more to the front to avoid
locking the rear wheels.
Both anti-roll bar settings
and brake bias are impacted by the ride height. As you raise
the ride height, more weight is transferred, so bias needs to
move toward the front and the bars need to get stiffer
overall.
Road and Street Circuits
For most of the cars other than
the GP Lotus and BRM, I tend to start the bars at about 150
to 180 at the front and around 110 to 130 at
the rear. The GP Lotus starts out with nearly equal values
front and rear, in the 140 to 160 range. (Note that the Lotus
Trainers seem to lack the GP Lotus' wide rear rims, so they use
values similar to the other Trainers.) The BRM gets higher overall
values because of its high CG.
For brake bias, I'll start out
around 58 and move it back until the car gets unstable
under braking. Circuits like Rouen and Mexico, which have corners
where heavy braking while turning is required, will wind up with
a click or two more front bias to help me keep from losing it
in these corners.
I adjust the bars, keeping the
overall roll stiffness the same, until the car is comfortable
for me in the corners. If the outside edges of the left side tires
are more than a degree or two higher than the inside edges, I'll
go a little stiffer overall.
Ovals
Because of the right front tire's
tendency to overheat, I tend to run the rear bar fairly
stiff. Before GRE became available, with its extended
ranges, I always ran the rear bar at 200 at all but the flattest
of the ovals. Now I can experiment with even higher values. I
run the front bar much softer than the rear, especially
on the more steeply banked tracks.
Overall roll resistance starts
at road course values for the shallow ovals and goes up for the
steeper ones.
Brake bias is set the same way
as on road courses. On the fast ovals, it's easy to neglect brake
bias, figuring it isn't important since you don't brake in the
corners. However, you do need the brakes when things start to
go wrong ahead of you, so it's worth it to get a decent balance
on the brake bias.
Transient
responses
The dampers can be used for
tuning the car's transient responses.
Deceleration
Under lift throttle, braking
and turn-in conditions, going stiffer in bump
at the front will tend to promote more understeer,
as will going softer in droop, or rebound, at the
rear.
Going softer in bump
at the front and/or stiffer in rebound at
the rear will tend to make turn-in crisper; it will
make the car less stable under lift throttle, braking and
turn-in.
The dampers at the outside
front and inside rear corners will have more effect
on deceleration, since that is where the greatest suspension movement
will be.
Acceleration
Under acceleration, going stiffer
in bump at the rear and/or softer in rebound
at the front will make the car make the car tend to be
more reactive to throttle; it will tend a bit more towards
power oversteer, especially if the driver gets on the throttle
abruptly. Going softer in bump at the rear
and/or stiffer in rebound at the front will
soften the car's responses to throttle application.
The dampers at the inside
front and outside rear corners will have more effect
during acceleration.
Tradeoffs
Within reason you can trade
off anti-roll bar stiffness for damper stiffness. For example,
you can stiffen the rear dampers in bump and rebound, and soften
the rear anti-roll bar. This will make the car more responsive
to brake and throttle applications. It will also react more to
bumps at the rear.
An advantage of this is that
if the car gets into a big slide, it will be more likely to recover
itself. On the downside, the car will tend to understeer in long
corners. The net effect will be that the car will be more forgiving
but may be a bit slower, especially on circuits with long corners.
See the Damper
section of the Basic Settings
chapter for more details on the impact of changes in damper settings
on the car's overall behavior. See the Damper
Tables for a handy reference to which corners have most effect
on transient responses.
Gear
ratios
Barring a really bad setup,
most setup parameters don't have a huge impact on overall lap
times. As Dave Kaemmer says, most setups in GPL mostly impact
driver comfort.
However, gearing in GPL is critical,
particularly at tracks with a long, uphill straight. Spa, Kyalami,
and Elkhart Lake are examples of circuits where gearing can have
a significant impact on lap times.
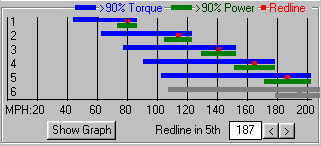 For
this reason, GRE provides a graphical aid (example shown at right)
for developing gear ratios. This graph has dots showing the speed
the car will be going at redline in each gear, and has bands covering
90% power and 90% torque. Once the top gear is known, this graph
helps the engineer to quickly select the proper gear spacing.
For
this reason, GRE provides a graphical aid (example shown at right)
for developing gear ratios. This graph has dots showing the speed
the car will be going at redline in each gear, and has bands covering
90% power and 90% torque. Once the top gear is known, this graph
helps the engineer to quickly select the proper gear spacing.
Top Gear
When developing gear ratios
for a given circuit, the top gear dictates the rest of the gearbox
setttings, so you need to get fairly close to the right top gear
first.
In Pro Damage mode, most of
the engines will not tolerate running at or above redline for
sustained periods. Even in Intermediate and Novice mode, abusing
the engine will lead to random blowups.
Therefore, it's important to
use a top gear tall enough
that the car does not quite reach redline on the longest straight.
This is particularly important on fast ovals and at road courses
with long straights, such as Spa, Monza, and Elkhart Lake. At
such tracks, the engine may go several hundred RPM higher in the
draft than when the car is running
alone.
I have a suspicion that the
Trainer engines may run out of steam even before their redlines.
They have relatively fat power curves, and it's possible that
their breathing is so restricted that their power drops off before
reaching redline. If that's true, it may be beneficial to gear
them so they never reach redline, and also to short shift when
going up through the gears. With the Advanced Trainer, even when
I think I've got a good top gear, I find that often I can go taller
and the car will go faster.
Low Gears
On the track, ideally the engine
will have just enough power to induce wheelspin in the lower gears
at full throttle. I think many people run the lower gears too
short. They like the responsiveness
of the car in the lower gears, and it's fun controlling wheelspin
with the throttle.
However, power above that which
can spin the wheels is wasted. It's much better to gear the car
so that this power is used at higher speeds. Therefore, I try
to pick the tallest bottom gears the car will pull in the lower
gears without bogging. I figure if the rear tires are just
on the edge of starting to spin under full power coming out
of slow corners, I've got the bottom gears just about right.
However, the available ratios
for the bottom two gears sometimes will not permit us to choose
as tall a gear as we'd like. The Cosworth, Repco, and both Trainer
engines would benefit from taller first and second gears on long
circuits, but unfortunately we have to work with what we've got.
Also, some engines have very
little torque in the low end of the rev range. The Murasama and
especially the BRM have this problem. Be careful not to gear these
so tall that they bog down coming off the slow corners.
Note that the Repco engine has
such a broad torque band that it's beneficial to use very tall
bottom gears. However, with a very tall first gear, sometimes
the Brabham won't start rolling even at full throttle from a dead
stop, if the engine is idling when you open the throttle. In this
case, a quick tap of the clutch will get the revs up and the car
will light up the tires and take off.
Gear Spacing
The obvious approach to gear
ratio spacing is to space the ratios evenly so that the redline
dots make a nice straight line from first to 5th. This approach,
however, would be wrong.
The car accelerates most quickly
in the lower gears, so it spends relatively little time in these
gears. The more powerful cars have an excess of power in the lower
gears as well. Any power above that which induces wheelspin.
On the other hand, the car spends
a lot of time in 4th and 5th gears on long straights. It's accelerating
slowly because most of its power is consumed by overcoming wind
resistence.
It's important to gear the car
so that most of the power and torque are
used where they are needed, which is at higher speeds.
Therefore, the most efficient gearing will show a parabolic
curve of the redline dots, with the high
gear dots spaced more closely together and the low
gear dots spaced farther apart. The broader an engine's
torque band, the closer together its top gear dots should be.
Spacing the lower gears out
and making the upper gears close together will also mean less
shifting in the slower bits, which will also save a little time.
Again there's an exception.
The BRM has such a narrow power band that it's not always practical
to space the gears as you would for the other engines. If the
low gears are spaced too widely, the engine bogs down after upshifts.
On circuits with long straights, optimal acceleration seems to
come from spacing the BRM's gears so that the redline dots are
just about in a straight line.
Sometimes it's beneficial to
set a certain gear a little taller or shorter than the setting
dictated by a smooth parabolic curve, in order to have just the
right gear for a critical section of the circuit. For example,
Kyalami has several short straights between second gear corners.
Some engines, with wide power bands such as the Ferrari, can be
geared so that no upshift to third is necessary.
Once you've optimized the lower
gears and the gear spacing, you may find that the car is accelerating
more quickly on the long straights, so you may need to raise the
top gear because now the car is reaching redline in top gear.
This, of course, may require you to readjust all the lower gears
to keep the optimal spacing.
Fine tuning
Keep in mind that many of the
setup parameters have an impact on the car's behavior that may
require adjustments to other parameters.
Once you've finalized your spring
rates and relative front/rear roll stiffness, you may want to
take a look at tire temperatures again, with an eye to making
a small camber change or change in the overall roll stiffness
to get the inside and outside edge tire temps on the left side
tire to be even. You may also want to see if the car will tolerate
a bit more rear brake bias, especially if you've done things to
increase the car's stability under braking and turn-in.
Once you're happy with the car,
you might try lowering the ride height a quarter of an inch. If
it still doesn't bottom the suspension
anywhere, leave it there. But check the tire temps again; now
you may be able to reduce the overall roll stiffness and go a
click farther to the rear on brake bias.
The whole process will be an
iterative one. As you hone in on a good setup, you'll probably
find yourself making smaller and smaller changes until finally
you've got a setup that's both comfortable and quick.
Your stopwatch and the seat
of your pants will tell the tale ... and that delicious feeling
in your gut when you realize you've put together a real sweetheart
of a setup.